Let’s face it: the factory halogen lights on the Wrangler aren’t at all exciting. They get dull pretty soon, have a narrow illumination range, and look average at best. LEDs, in turn, are an entirely different story. They last for a really long time (up to 50K hours), boast impressive coverage and distance, and look badass. However, even the Best LED Headlights for Jeep Wrangler won’t work unless you install them properly.
On the bright side, the installation process is pretty straightforward, and if you follow my guide closely, you’ll be done in no time! First, we’ll talk about removing the old lights. Then, we’ll move on to mounting your new headlights. Last, but not least, I’ll cover proper headlight adjustment. Alright, without further ado, let’s get right into the thick of it!
LED Headlight Installation
Step #1: Removing the factory lights
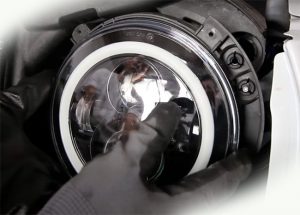
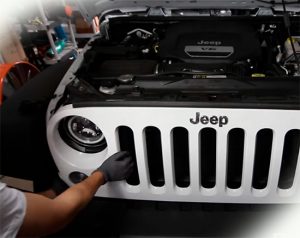 First things first, pop the hood. To access the stock headlights, you’ll have to remove the front grille. Do this by removing the screws and the clips that are holding it in place. With that done, pull it out. The best way to do that is to push it up with one hand while holding it with the other one. Be careful with the grille: it can be pretty heavy. The next step would be to get rid of the screws (four in total) on the metal rings around each headlight.
Once those are off, nothing will be stopping you from taking the lights off. Unplug them gently and put them somewhere safe, as you never know when you might need them. Say, if the new LEDs refuse to work for some reason, and you need to use the Jeep the next morning, putting the factory halogens back won’t be a problem.
Step #2: Installing the LEDs
Ok, now we can get to the actual Jeep Wrangler LED headlight installation routine. This will be even easier than removing them. Basically, all you’ll have to do is repeat everything you just did in the reverse order. Now, most manufacturers pack all the necessary hardware with the lights, including bolts, screws, clips, metal rings, and an adapter. Make sure you get the full package because hardware intended for halogen lights probably won’t fit LEDs.
 And different Jeeps use different sockets. Say, if it’s an H4, and the lights are H13, the adapter will make it all work. If the head beam is malfunctioning, don’t panic just yet. Chances are, it’s the LED driver module box acting up. Make sure the adapters are firmly connected, and no pins are out. This module is the anti-flicker system, by the way; without it, you might overheat the headlights and, well, burn them.
Here’s how you connect the module to the headlight harness: the blue wire is for grounding. The yellow cable needs to be tapped to the left and right turn signal positives. Then there’s an extra yellow wire and it is for turning off the LED halo ring – it connects to the headlight positive. The main wire, of course, goes straight to the battery.
A quick note: if the high beam doesn’t turn on from the first try, you’re most likely dealing with a drained battery unit. Finishing up, put the metal rings back on and reinstall the front grill that covers the lights.
LED Headlight Adjustment
Step #1: Preparing the Vehicle
If you’re not happy with how your headlights are behaving on and off the road (not illuminating the path enough, or covering only a small area), re-adjustment is in order. Misaligned lights are pretty dangerous, as they can “blind” oncoming drivers and potentially cause a crash. Fixing this won’t be a problem, though. We start the LED headlights adjustment procedure by getting the Jeep ready.
I highly recommend removing all your stuff from the trunk/back of the Jeep. Next, make sure the pressure in all four tires is at the right (factory) level. With that out of the way, find an even surface with a dark wall to park the vehicle. A garage might be a good place to start; a parking lot will be even better. Check the shock absorbers and the suspension to ensure they’re in a proper shape. Oh, and the car should be 10-15 feet away from the wall.
Step #2: Turning on the Lights
With the Jeep in a “ready-for-action” position, switch the headlights on (not the fog lights or the high beam, though). Use some masking or duct tape to mark the beam on the wall. Just put two lines on top of each other in the shape of a cross – they should mark the horizontal and vertical centers of the beam. Do this for both headlights and make sure the center lines on each side are on the same level.
If not, correct them so that they fit – a carpenter’s level will help you do that. Don’t rush yourself: take as much time as needed. As soon as you’re happy with the alignment, back the Jeep by 25 feet and turn off the lights. Trust your vehicle’s manual on this one: some brands recommend keeping a smaller distance (like 10 feet), while others require even more.
Then, pop the hood, remove the so-called “trim rings” from the headlights, and find the adjusting screws. These shouldn’t be hard to locate, but in some older Jeeps, the screws are in the engine bay. In any case, you’ll see two screws: one for horizontal alignment, and one for vertical.
Step #3: Adjusting the LEDs
Alright, we’re down to the exciting part! The most important thing here is to block one of the headlights so that you can fully concentrate on the other one. Plus, it would be best to have a friend sit in the car and help you out with the adjustment process and turn the lights on and off when needed. The upper screw controls the vertical movement: turn it clockwise to raise the headlights and vice versa.
Here’s what you should do: adjust the vertical field until the top of the brightest part of the beam is even with the center of the “cross” you made earlier with tape. Repeat the same with the vertical field screw, and that’s it. The beam needs to be mostly to the right of the line. Finishing up, take the Jeep for a spin to make sure the headlights are properly aligned.
Add Comment