Removing the hard top from a Jeep Wrangler need not be an intimidating task. With the proper approach and tools, it can be done efficiently, allowing you to transform your vehicle for seasonal or recreational needs. This guide outlines essential techniques and safety tips to ensure a smooth removal process, enhancing your Jeep experience while preserving the integrity of both the hard top and the vehicle.
Preparing for Removal
Proper preparation is the first step to a successful Jeep hard top removal. Essential tools include a Torx head driver set and possibly a hoist system if frequent removals are anticipated. A level work area is crucial, as uneven surfaces can complicate the process. Before starting, it is wise to disconnect any electrical connections and ensure all tools are readily accessible. This preparation helps avoid potential mishaps that could damage the vehicle or cause personal injury. For Jeep owners considering a more versatile and lighter option for the warmer months, the Best Soft Top for Jeep Wrangler provides an excellent alternative. More on this can be found in another of our detailed articles, enhancing your vehicle’s adaptability for different weather conditions.
Essential Tools for Jeep Hard Top Removal
To ensure you have everything you need for a smooth and effective Jeep hard top removal, selecting the right tools is crucial. Below, you’ll find a comparison table that breaks down the tools most suitable for the job, along with recommendations for specific products that can help streamline the process. This selection can make the difference between a frustrating experience and a successful, easy removal of your Jeep’s hard top.
| Tool Type | Purpose | Recommended Product |
| Torx Head Driver Set | Unscrewing the hard top | Craftsman 28-Piece Bit Socket Set |
| Hard Top Hoist | Lifting and storing the top | Smittybilt Hard Top Hoist |
| Storage Cart | Mobile storage solution | Lange Originals Storage Cart |
A good set of tools can prevent damage to both the top and the vehicle, ensuring that your Jeep remains in top condition throughout the process. By investing in these recommended tools, you can enjoy a hassle-free transition from a hard top to an open Jeep, ready for any adventure.
Detailed Removal Steps
Removing the hard top from your Jeep Wrangler involves several key steps that should be followed carefully to ensure a safe and damage-free process. Here’s a detailed list to guide you through each stage:
- Remove Freedom Panels: Start by removing the Freedom Panels if your model includes them. These are located over the driver and front passenger seats and can usually be unlatched easily. Gently lift them off and store them in a safe place to prevent scratches or damage.
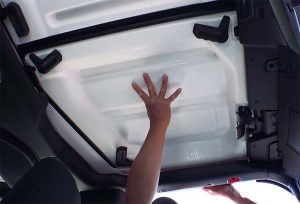 Unfasten the Bolts: Using a Torx head driver set, locate and remove the bolts that secure the main section of the hard top. Jeep Wranglers typically have several bolts along the perimeter of the hard top. Keep these bolts in a secure place as you will need them for reinstallation.
- Disconnect Wiring Harnesses: If your hard top is equipped with features like a rear window defroster or a wiper, disconnect the wiring harnesses. These are usually located at the rear or along the sides of the hard top. Handle the connectors gently to avoid damaging the pins.
- Detach the Washer Fluid Hose: For models that have a rear window washer, disconnect the hose. This step prevents fluid from leaking when you remove the hard top and protects the hose from accidental damage.
- Lift Off the Hard Top: This step requires at least two people or a specialized lifting device like a hard top hoist. Carefully lift the hard top straight up to clear it from the Jeep’s body. It’s important to maintain stability and lift evenly to avoid stressing the hard top.
- Store the Hard Top Properly: Once removed, place the hard top on a dedicated storage cart or use a hoist system to store it safely. Ensure it is positioned in a manner that prevents warping or other damage.
Storing and Reinstalling Your Hard Top
Once the hard top is removed, proper storage is crucial to maintaining its condition. A dedicated storage system, like a hard top hoist or cart, can prevent damage and make the top easier to reinstall. The storage area should be dry and free from extreme temperatures to prevent warping or deterioration of the material. Always ensure that the hard top is supported evenly to avoid stress on any one point, which could lead to cracking or deformation.
Reinstalling the hard top involves carefully reversing the removal steps. Begin by placing the hard top back onto the Jeep, ensuring it aligns properly with the body. Reattach all bolts, making sure they are tightened to the manufacturer’s specifications to maintain a secure fit and proper seal. Reconnect the wiring harness and washer fluid hose, if applicable. Regular maintenance checks are recommended to keep the hard top in good working order and to ensure the seals remain effective against the elements.
Conclusion
With the right tools and some careful planning, removing and reinstalling a Jeep Wrangler hard top can be straightforward and hassle-free. This guide provides you with the essential steps and advice needed to efficiently manage the removal and reattachment of your hard top, enhancing your Jeep’s versatility for open-air experiences. Remember to handle all components with care, and ensure that each step is performed methodically to maintain the integrity and functionality of your Jeep. By following the outlined procedures, you can confidently enjoy the flexibility of your vehicle in any season, knowing that your hard top is safely stored and ready for reinstallation whenever needed. Regular maintenance and proper handling will help extend the lifespan of both the hard top and the vehicle, ensuring many years of adventurous and enjoyable driving experiences.