The light on the Ford Super Duty trucks is located in a very hard to reach place. Luckily, changing the headlight yourself is not difficult and can be done with some simple tools that you might have around your house. The first step in this process is to find where the bulb is positioned at on your truck. This will require looking into your owner’s manual or checking online for an exploded diagram of the truck model you own. Once you know where it is, remove all unnecessary parts from underneath your truck so that there won’t be any obstacles in reaching the light.
 If you’re not sure what model year you have, look inside the driver’s side door panel near where the steering wheel meets the base of the seat. You should see two stickers with an abbreviation followed by “MY” and a number. If you have the “MY16” sticker, then your model year is 2016.
-
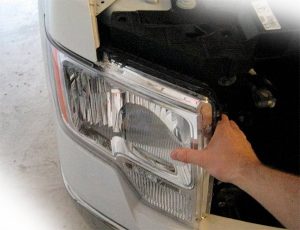
Remove the headlight assembly by pulling it out with both hands from the front of the truck (wheel well side). This will require some force but be careful not to break anything like plastic clips or wiring harnesses that are attached in there. Place this somewhere safe where nothing can get damaged or dirty as these parts must be reused when replacing just one bulb on each side of the vehicle.
-
Pulling back gently at an angle should reveal two sets screws securing either end of a metal bracket holding up three light bulbs – one high beam and two low beams for right/left sides respectively. Remove the screws from both brackets, then slide the entire light assembly out.
-
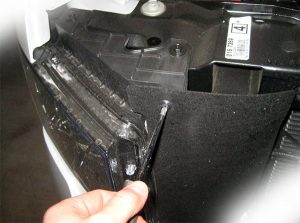
Take off any electrical connection clips by pulling them gently apart and set aside for when you put everything back together in reverse order. The two ends of a long yellow cord are attached to each pair of lights with small metal tabs that should be exposed after removing the plastic insulation caps on either end (the ones circled below). Take note which tab is connected to what wire bundle before moving forward as you’ll need this again later. There’s also a short brown/black connector cable that attaches near the middle of all three bulbs, but it doesn’t have an extra piece at one or other end like the bulb cables do so just leave it alone for now.
-
 Once the electrical connections are free, take care of any adhesive tape holding down one or more bulb end. The number and size of tabs will depend on which bulbs need to be replaced but in general you’ll want to remove all three so that it’s easier to change out just one without losing any parts. Once everything is removed, slide the new light bulb into place with the base going towards where a metal tab was before. It should click securely inside as long as there’s enough room for it – if not then try sliding it up/down slightly until you can get those clips back together again at either side (which also locks them tight).
 -
Reattach both sets screws by pushing firmly from each bracket. Replace the headlamp assembly by guiding it into place from the wheel well side and pushing firmly until you hear a click.
-
Reconnect all electrical connections, then test to make sure everything is working before putting back together or driving. Make sure everything is correct. May be you will have to adjust your headlights.
Conclusion
There’s no denying it now – now you know how easy changing out headlights is for someone who knows what they’re doing! So go ahead and try it yourself when the time comes – you’ll be glad you did!
Add Comment