
It’s no secret that engines don’t last long without oil. That’s because it lubricates all the individual parts and reduces friction. On top of that, proper oil cools down the motor and keeps everything clean. Now, changing it in time is very important. That way, you’ll get rid of the sludge that makes the engine run less smoothly and increase its lifespan.
So, the big question is – how often should you change it? Premium-quality oil can last for as long as 5-7K miles, which roughly means you’ll have to do this twice a year. Good news: oil doesn’t cost that much, and it won’t take you long to drain the old fluid and replace it with a new one. To help you get everything right, I made this short and user-friendly guide. Check it out!
Before We Start
 We’ll get to the actual step-by-step guide in a moment, but before we do, there are some things to keep in mind. First of all, it doesn’t matter whether you’re changing Oil for Ford 6.7 or any other engine, truck, or vehicle. That’s right: the process of changing the oil is always the same. What you should, however, know in advance, is how much oil your car’s engine requires. Some run perfectly on five quarts (160 ounces), while others need six, or even seven.
Secondly, check the viscosity grades. Different vehicles have slightly different viscosity (which basically means thickness, or consistency, to be more precise). This is very easy to figure out: just Google your car’s exact name and model year, and the right information will pop up. Or, get in contact with the manufacturer. The oil type also matters. You’ve got conventional (the cheapest), full synthetic (the most expensive one), and semi-synthetic (the golden middle).
And one more thing: oil brands usually specify which engines their product is compatible with, not cars. So, if you see something like “Oil for 5.4 Triton” in the specs, that means you can use it for a long list of Ford vehicles. I’m talking about F-150, Expedition, Mustang, and even a couple of Lincolns.
What you’ll need for the Job
- An oil filter
- A drain plug
- A bucket (to fill it up with the old oil)
- An oil wrench and a regular wrench
- A set of gloves (to keep your hands clean)
- A jack with jack stands (ramps and a hoist are also an option)
Learning how to Change the Oil Properly
Jacking up the Car and Accessing the Oil Pan
First things first, you need to lift the vehicle high enough so that you can “crawl” underneath it and change the oil. A jack with jack stands is the best option, but ramps or a hoist will also do. Safety comes first: find an even spot where you can place the stands, and never use a jack to hold the car up.
With that out of the way, go ahead and remove the plastic undertray. It’s located at the bottom of most modern vehicles and keeps engine noise to a minimum and protects the motor from dirt and water. Most likely, you’ll see bolts or screws holding it, or maybe plastic clips.
Unplugging and Draining the Old Oil
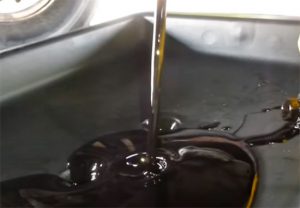 The oil pan will have a so-called drain plug. To remove it, loosen the thing with an average-sized wrench and then unscrew it. Remember: go counterclockwise. Don’t forget to get a bucket, container, or anything else big enough to “accommodate” the old oil. There can be a lot of it, by the way (up to a gallon, or more). So, make sure none of it gets splattered around.
Remove the drain plug slowly so that you can control the oil’s flow. This can take a while. I usually wait for about five minutes before I move on to the next step. Or, you could watch the stream. If it’s getting really-really weak, that’s also a signal that there’s very little oil left in there.
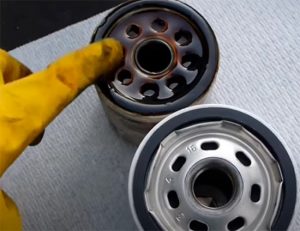
Getting Rid of the Old Filter
The oil filter has a cylindrical form and shouldn’t be hard to locate. Turn it counterclockwise using a wrench. Depending on how tight it is, it may be better to use your hands for this. As you’re doing it, the oil will start pouring out from the very top. I recommend giving it a minute or two and only them removing the filter completely.
Alright, now it’s time to install the new filter. Make sure to also remove the old filter’s gasket (it’s a relatively thin rubber with an O-ring form). If you forget about it and leave it up there, the new filter won’t be installed properly. That, in turn, will lead to the new lubricant leaking out and, essentially, damaging the engine (especially if this happens on the road).
Putting the New Plug and Filter On
 Grab that new and shiny plug and tighten it properly. Don’t use all of your strength on it, though. With some brands, there are clear torque specifications that drivers can follow (when using a torque wrench, of course). Now, you might have to put a washer between the oil pan and the plug for it to fit snug. Be similarly careful when handling the new oil filter. It should be nice and tight, but not overdone. I always follow the “hand tight” rule on this one.
Finishing Up
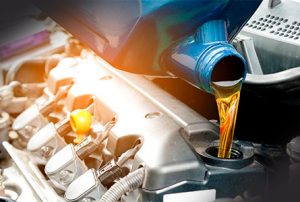
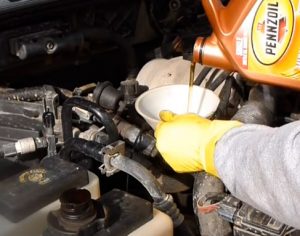 Alright, we’re almost there! All that’s left to do now is fill the engine up with the new oil. Make sure the undertray is back in its place and properly sealed. Next, bring the vehicle back down. With that out of the way, open the hood, remove the oil cap, and, well, get to pouring. As I mentioned in the beginning, different motors require different volumes of oil. Check that before proceeding.
The oil takes a couple of minutes to settle in and fill up the engine. Last, but not least, start the car and let it “breathe” for a while. When it’s warm, it will be easier to check for any potential leaks.
Add Comment