
This detailed guide will walk you through the steps on how to test a spark plug with a multimeter. Learn to perform this essential check to diagnose potential issues with your vehicle’s spark plugs, ensuring optimal engine performance and longevity. This process is not only straightforward but also crucial for preventing costly engine problems.
A well-functioning spark plug is pivotal to the efficient operation of your vehicle’s engine. Over time, spark plugs can degrade due to wear and contamination, leading to issues like misfiring, reduced fuel efficiency, and increased emissions. Fortunately, by using a multimeter, a tool commonly found in automotive tool kits, you can diagnose the health of your spark plugs effectively. This guide will provide detailed instructions on how to test a spark plug with a multimeter, allowing you to determine if they are functioning correctly or if they need to be replaced. This preventative maintenance can save you from future engine troubles and maintain your vehicle’s performance.
Preparing for Test Spark Plug with Multimeter
Before beginning to use the multimeter to check your spark plug, there are some steps that should be taken in preparation first:
-
 Gather Supplies: Before beginning any work on your vehicle, make sure that you have all of the necessary supplies for testing the spark plug with a multimeter. This includes an adjustable wrench, silicone spray lubricant (if needed), and most importantly, a digital multimeter designed specifically for automotive uses.
 -
Ensure Vehicle Is Off & Disconnect Battery Cables: Once you have all of your supplies ready, make sure that your vehicle is off and then disconnect both battery cables from their terminals on either side of your battery before beginning any work.
-
Locate the Spark Plug: Once the battery cables have been disconnected, locate the spark plug for your vehicle. Generally this is located near the center of your engine towards the top and may be hidden by a protective cover.
Steps for Checking the Spark Plug with a Multimeter
Once you have completed all of the preparatory steps, you can move on to testing the spark plug with a multimeter:
-
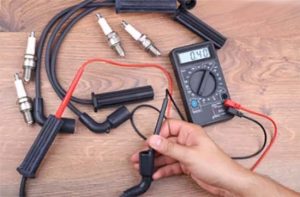
Set Up Your Meter and Connect It to the Spark Plug: In order to check your spark plug with a multimeter, begin by setting up your meter and connecting it to one of the electrodes on the spark plug. Make sure that you have selected an appropriate resistance range on your multimeter and ensure that it is correctly connected before taking any readings. Additionally, if there is any corrosion or buildup of contaminants on or around where you will be attaching your meter, spray it off with silicone lubricant so that there are no electrical interruptions during testing.
-
Read Ohms Values Of The Meter: After connecting your multimeter to one of the electrodes on the spark plug and making sure it is correctly reading resistance values, read off what appears as an “Ohms” measurement on the display. Generally, a good spark plug should read between 4 and 10 ohms of resistance. If it reads higher than that, then your spark plug may be in need of replacement.
Conclusion
Mastering how to test a spark plug with a multimeter is a crucial skill for any car enthusiast or vehicle owner. This guide has provided detailed steps on how to test spark plug with multimeter, enabling you to diagnose and address potential issues with your spark plugs efficiently. Regular testing can prevent engine misfires, enhance fuel economy, and ensure your engine runs smoothly. By integrating this testing technique into your routine vehicle maintenance, you maintain not just the health of your spark plugs but also the overall performance of your engine. This knowledge empowers you to handle common vehicle problems on your own, potentially saving money and improving your vehicle’s longevity.
Add Comment