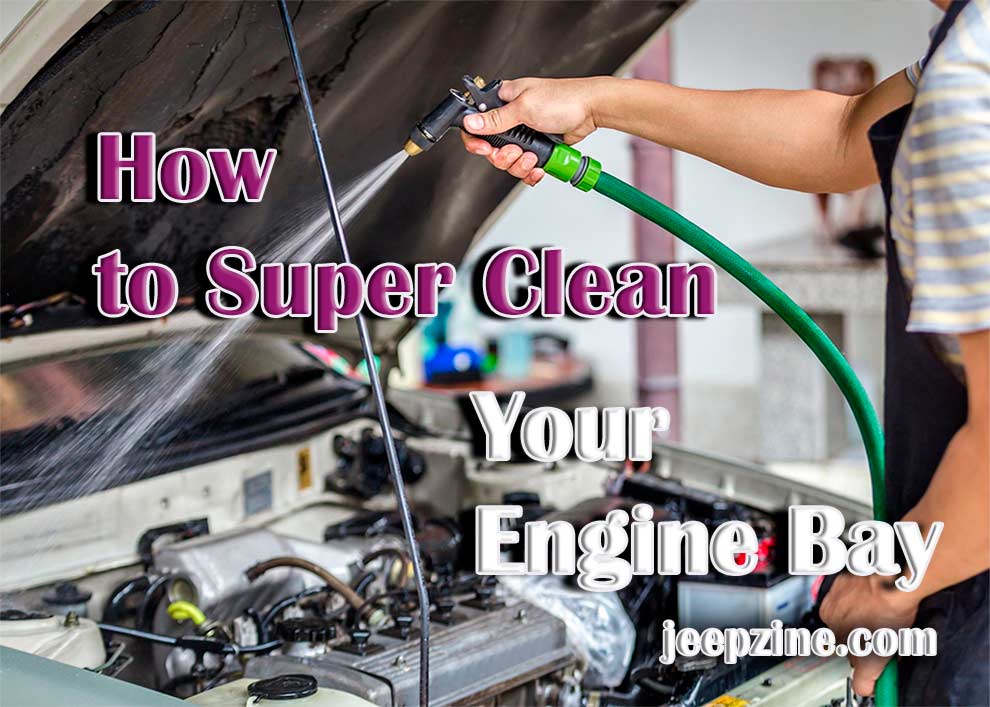
Let’s face it: most of us are either too lazy or simply don’t know how important it is to keep the engine bay clean. Been there, done that. However, you’ll be amazed by how big of a difference proper detailing makes. An engine bay that’s been taken care of will perform better, last longer, and rarely break down. So, today, we’ll learn how to super clean your engine bay.
Don’t worry: no expensive tools or formulas will be required. Just some basic degreasers, safety equipment, and rags. And no, you won’t damage anything if you follow my guide carefully. This can actually be done fairly quickly and with very little effort. So, if you’re ready to put some work in and super-clean your four-wheeled friend’s engine, here’s how you do it!
#1: What you’ll need for the Job
 It’s true that every single engine is unique. With that said, you won’t have to get any brand-specific tools/products or anything like that. The list of the required cleaning stuff is always gonna be the same. And the best thing about this equipment – you won’t have to spend a fortune to get it. So, take a quick look at what you’ll need:
- A set of rubber gloves
- Safety goggles
- A mask (to protect against dust)
- An engine degreaser
- A couple of plastic bags
- A garden hose/power washer
- An air hose/vacuum
- A set of cleaning brushes
- Microfiber towels
Yep, the list isn’t particularly short, but, in all fairness, it shouldn’t be hard (or expensive) to get it. Besides, I bet you already have a vacuum, some gloves, and a couple of towels at home.
#2: Starting Slow
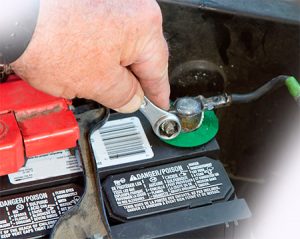 The first thing to do would be to turn off the engine. NEVER do this while the motor is still hot, as you’ll run the risk of ruining expensive components. So, switch off the engine, pop the hood, and give the car at least 30 minutes to cool off. Next, disconnect the negative battery terminal. Otherwise, the electronic components will get burned when they come in contact with water.
Some experts recommend removing the battery unit completely; but, this isn’t 100% necessary. Besides, you can always cover the battery with a plastic bag. Do this with all the ignition wires, fuses, spark plugs, and the alternator. Basically, cover all the exposed electronic parts. Now, I would also recommend doing this on a warm, sunny day. That way, the engine bay will dry way sooner.
#3: Getting Into the Thick of it
Alright, we’re done with the basics. Now let’s move on to the main part of this “how to clean engine bay” guide. There’s nothing hard about this. Nor are there any “hidden techniques”: it all comes down to just getting the right products and spending 30-40 minutes on cleaning.
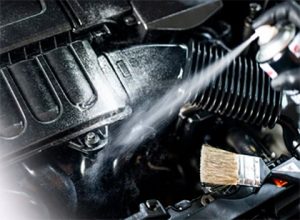
Dry Cleaning
An air hose will be best for this, but a regular vacuum will also do. The key here is to remove as much dirt, debris, and other contaminants as possible. Don’t switch the hose/vacuum to the max settings, though – use the standard presets. A synthetic brush will help you clean the stubborn stains. Caked-on oil, lube, and “engine juice” can turn into harmful gunk pretty quickly. Well, they can be dealt with using a brush with synthetic bristles.
Degreasing
 With dry cleaning out of the way, grab that degreaser and get to spraying. Use a healthy amount and make sure every corner of the engine bay gets enough of it. Degreasers that were specifically formulated for cars will perform better. However, it’s safe to say that any solution will work, even the cheap ones from your local store. And if you’re on a tight budget, go with soapy water – it’s a surprisingly strong engine cleaner!
Rinsing
For rinsing, I always use my garden hose – it works beautifully. Power washers are considered to be a better tool, but they’re also not cheap. If you don’t have any of that, drive the car to the nearest DIY car wash. They won’t charge you much for using their sprayer. The goal here is to remove the degreaser from the engine bay. Go from back to front, not the other way around.
A quick note: although we already covered all the electronic components, I still want you to be very careful with the hose/sprayer. And, try not to spray too much water into the deep, dark areas that take a lot of time to dry. That’s pretty much all there is to rinsing.
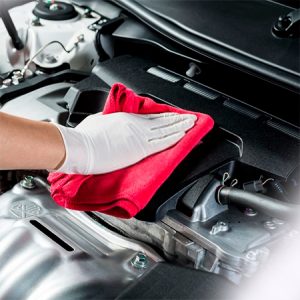
Drying
Ok, we’re almost there. All that’s left to do is to dry the engine compartment. You could just leave the hood open for a day or so, and the sun will do the trick. Or, if you need the car operational the next morning, grab a couple of towels/rags and do some manual drying. While you’re at it, look for some spots where some grime might be left and remove that as well.
#4: Finishing Up
Everything looks good? Then put the battery back in, reattach the negative terminal, and remove the bags. Close the hood, start the engine, and take the car for a spin. Oh, and make a habit of super-cleaning the engine bay at least once in two years to avoid premature failure. Drive safely, and I’ll see you next time!
Add Comment