Removing a vehicle’s door panel is a simple task that can help you troubleshoot or fix issues with the window, door handle, or other components of the door. It’s an excellent first step in the DIY automotive world, often leading to other more advanced maintenance tasks. It’s important to be aware that each make and model of vehicle has its specifications for taking off the door panel. This diversity reflects the different design philosophies of car manufacturers, making each car unique in its way. Below are general guidelines for removing a door panel, but always consult your owner’s manual for specific instructions that apply to your vehicle. This is the key to successful, damage-free door panel removal.
Gather Supplies
Before attempting to remove the door panel, gather the necessary supplies:
- A plastic pry bar (preferably one with extra leverage)
- A flathead and Phillips head screwdriver
- Pliers (optional)
Organizing these tools before you begin will make the task smoother and more efficient. It’s also helpful to have a drop cloth or blanket handy in case screws fall on the ground or pieces of trim come loose during removal. A minor investment in these items can save you a lot of time and frustration. Also read here about the Jeeps with no doors.
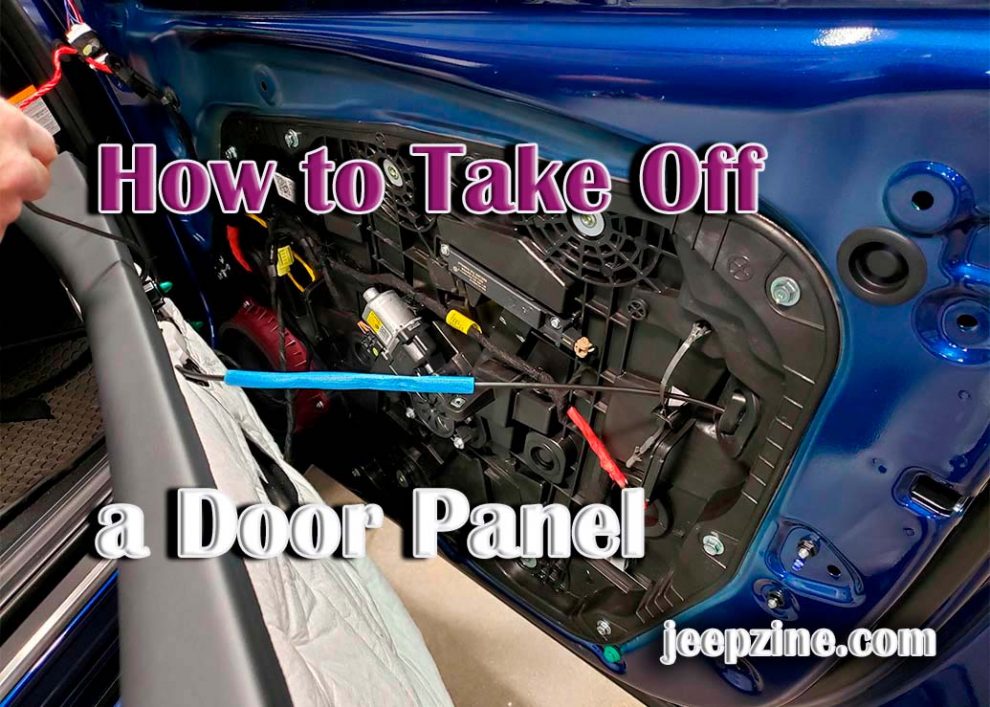
Removing the Trim Pieces and Unscrewing the Door Panel Fasteners
 To start, use your plastic pry bar to carefully remove any trim pieces around the perimeter of the window frame and along the edges of where it meets interior upholstery and other interior trim pieces. Carefully work your way around until all these pieces are detached. Patience and precision are key during this step, as improper removal could lead to unnecessary damages and subsequent repair costs.
Next, use a Phillips head screwdriver to unscrew all the door panel fasteners (usually located at the base of the door panel). Once all screws are removed, carefully pull away any plastic plugs or rivets that may be holding them in place. Take note of how and where each fastener fits, as this will help when it’s time to put everything back together.
Removing the Door Panel Hardware and Electrical Connections
At this point, you can begin to lift off the door panel from its frame. Before doing so, however, it’s important to check for any electrical connections that may still be attached to the back of it (e.g., window switch wiring). If present, disconnect these gently by pressing on their tabs and pulling away from their ports on the back of the panel. This step is critical to prevent damage to any electrical components or wiring. Once all electrical connections are removed or detached, you can proceed with taking off the panel completely. Also, if you are facing issues with a squeaky or hard-to-move door, you might consider a Car Door Hinge Replacement. This step-by-step process can effectively resolve these common issues, further enhancing your vehicle’s functionality and longevity.
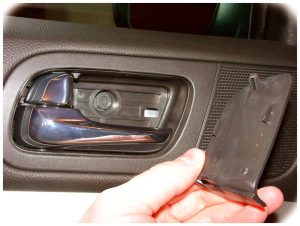
Carefully Detaching the Door Panel
When lifting off your vehicle’s door panel take care not to bend or damage it in any way as this could lead to more costly repairs down the line if it needs replacing. Have your drop cloth laid out so you can easily set down any screws or trim pieces as you remove them. Once the panel is free from its frame, pull it away slowly while holding onto it with both hands. Slow and steady is the mantra here – a damaged door panel can be expensive and time-consuming to replace.
<!—->
Conclusion
By following these steps for how to take off a door panel, you should now be able to access the inner workings of your vehicle’s door and troubleshoot any issues or make repairs as needed. Be sure to reinstall the door panel after completing your work and use your owner’s manual for guidance on how to do so correctly. This newfound understanding of your vehicle’s door mechanisms will not only be beneficial for this task but also for any future repairs or replacements that you might need to carry out. It’s another step towards becoming self-sufficient in maintaining your vehicle.
Add Comment