
Knowing how to properly test a car battery is an essential skill for any vehicle owner. A weak or failing car battery can leave you stranded with a no-start condition and is the leading cause of breakdowns on the road. Testing your battery regularly and replacing it when necessary helps ensure your car starts reliably in any situation. Checking battery health goes hand-in-hand with regular maintenance like oil changes or inspections. This article will walk through the necessary steps, tools, and testing procedures required to accurately evaluate your car battery’s condition. With a simple voltmeter, load tester, and visual inspection, you can catch potential issues before they strand you somewhere at the worst possible time. Don’t take your battery for granted – learn how to fully test it yourself using the steps outlined below.
Gather Necessary Tools
Testing a car battery requires only a few essential tools. You’ll need:
- A multimeter to test battery voltage
- A battery load tester to simulate cranking and test battery performance under load
- Safety glasses and gloves to stay protected when working near a battery
- Basic hand tools like wrenches or pliers to access and clean the battery terminals if needed
Having the proper gear makes testing efficient and keeps you safe from sparks or battery acid. Don’t skip grabbing the right tools before getting started.
Turn Off Electrical Components
Before testing, ensure all lights, accessories, and systems in your car are switched off. This gives the most accurate reading of your battery’s charge level. With electronics like the radio on, voltage results can seem artificially high. Start by turning the ignition to the off position, then follow by switching off headlights, interior lights, and any charging devices. Rolling up windows can also minimize the drain on your battery during testing. Sitting in silence sets the right mood for concentration while testing too!
Inspect the Battery’s Physical Condition
Take a close look at the battery’s overall condition before hooking up test equipment. Check for:
-
Any cracks, leaks, bulges, or excessive corrosion around the posts and casing. Batteries with physical damage or leaks cannot be accurately tested and should be replaced.
-
Make sure the battery is firmly secured in the tray and all connections are tight. Wiggle the terminals and hold-downs to check for looseness.
-
Inspect the battery for any signs of overheating. Look for warped or melted plastic on the case.
-
Examine the battery posts and terminals for buildup, corrosion, or damage that could impede connections.
Testing works best on a battery that is properly installed, undamaged, and clean. Visually inspecting the battery first helps identify issues that could impact accurate testing.
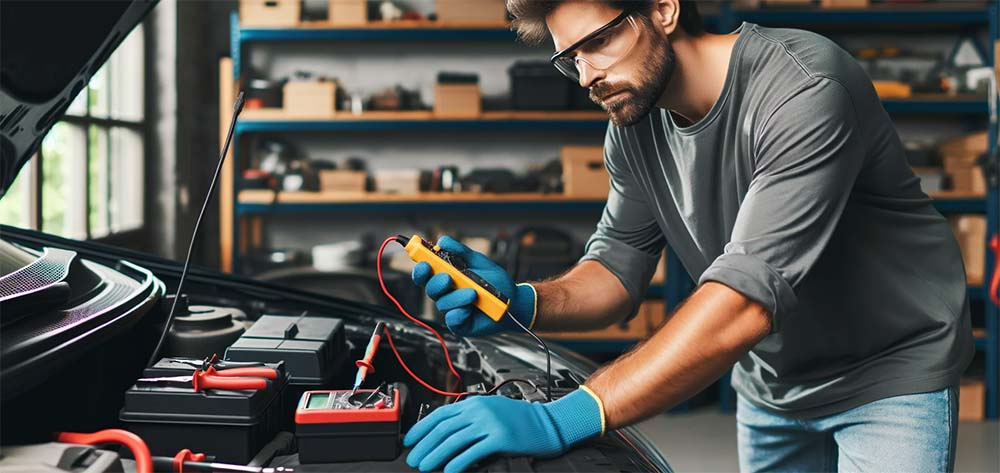
Test the Battery with a Multimeter
The key battery test is measuring voltage with a multimeter. Set the meter to the appropriate DC Volts scale, usually 12 or 20. Attach the red lead to the battery’s positive terminal and the black lead to the negative. A fully charged battery will show between 12.4 and 12.6 volts. Anything under 12 volts indicates a need for charging. Pay attention if voltage drops rapidly during testing, a sign of a weak battery. Testing voltage cold and hot can also reveal problems holding a charge. Use the multimeter numbers, not any built-in battery tester, for the most precise results.
Load Test the Battery
While a voltage test reveals charge level, a battery’s true performance comes under the heavy load of cranking the starter motor. Use a dedicated battery load tester for the most accurate load testing. Hook up the tester’s leads, then press its button to apply a high current draw and simulate starting. Check that voltage stays above 9.6 volts on a fully charged battery. If voltage dives lower under the tester’s load, your battery may be weak or have bad cells. The battery load test shows whether yours is up to the harsh demands of real-world use.
Check the Battery Posts and Terminals
Dirty or loose connections can also cause battery problems. Inspect the top of the posts and inside the cable clamps for dirt, grime, or white corrosion buildup. Use a wire brush or sandpaper to gently clean any contamination. Baking soda neutralizes battery acid corrosion. Tighten connections with wrenches and coat posts in dielectric grease to prevent future oxidation. Proper connections ensure your battery receives and sends maximum current. Don’t neglect inspecting these crucial connections during testing.
Conclusion
Knowing how to accurately test your car battery saves money on premature replacements and prevents being stranded with a dead battery. Be sure to check voltage with a multimeter, assess performance under load using a dedicated tester, and inspect physical condition and terminal connections. Testing the battery regularly allows you to catch issues early before they leave you stranded somewhere at the worst possible time. Our other article on the best group 65 battery provides more details on battery types, ratings, and replacement recommendations when yours finally fails testing. The battery is the heart of your car’s electrical system. Be empowered to properly test and catch issues before they become roadside headaches. With the right tools and process, you can stay on top of your battery’s health and ensure your car starts whenever you need it.