On average, shock absorbers last for 7-8 years. However, on a heavy-duty truck like the F250, you might have to replace them every 4-5 years, especially if you do a lot of towing, hauling, and some type of industrial work. Sadly, many truck drivers tend to neglect the obvious signs of malfunctioning shocks and keep driving until they completely fall off and cause big trouble.
Even if you’ve got the Best Shocks for F250 Super Duty, they won’t last forever. To avoid accidents on the road, I highly recommend replacing the absorbers the first chance you get. That’s actually why I wrote this detailed guide: to help you change the shocks on your own, without paying a mechanic/auto shop. Follow me closely, and we’ll be done with this in no time!
#1: Getting Started
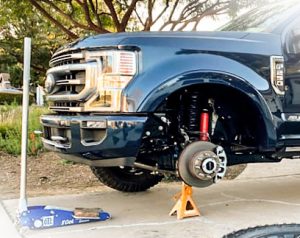
We start by jacking the truck. Find a smooth, level surface where you can park the F250. Ideally, it should be the area in front of your garage, where you’ll have quick access to the tools. Next, loosen the lugs a bit on all four wheels, but don’t remove them completely. With that out of the way, use a couple of jack stands (or ramps) to secure the truck. Get your hands on Ford’s user manual for the exact right spots for the jack stands.
Once the vehicle is up, go ahead and remove the wheels for good. Alright, now we have easy access to the shock absorbers. To get rid of the stock shocks, you won’t need deep knowledge of the suspension system or advanced repairman skills. The F250 is a “workhorse” and easier to customize than most “civilized” vehicles. So, let’s go ahead and see how we can handle the shocks quickly and easily.
The Tools for the Job
 Here are the right tools for proper installation:
- A regular 13/16 wrench
- A set of sockets (18, 19, and 21mm)
- A ratchet with a standard extension
- A U-joint socket
- A pry bar and a torque wrench
- A set of protective gloves
- Rust penetrant for easy removal
#2: Removing the Factory Shocks
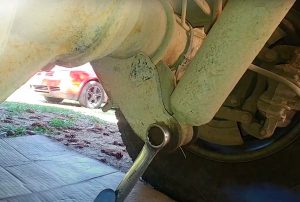 If you’ve been driving around for at least a couple of years, there will be some rust on the shocks. Use the rust penetrant, spray a healthy amount, and let it sit for a minute or two. Now, each shock will be secured by two nuts in the top corner – they’re holding the stud in place. So, start there and use the 13/16 wrench to hold the lower nut (and prevent it from spinning), and a socket of the right size to loosen the nut right above it.
With that done, pop the hood to access the top of the shock. For this, I recommend a 21-millimeter socket with a regular extension. The idea is to grab the bolt/stud from the top. If it turns out to be a big challenge, switch to a U-joint socket. Go ahead and loosen up the nut.
Handling the lower Nut
We’re not done yet, though, because there’s another nut in the very bottom securing the absorber. It shouldn’t be hard to remove: an 18-mm socket + a ratchet will do the trick. On older F250 trucks, removing the shock completely may be a bit tricky. If that’s the case, don’t hesitate to use a pry bar to get it unstuck. A screwdriver can also work.
#3: Installing New Absorbers
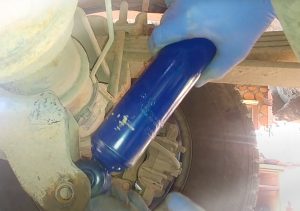 Alright, now we can finally install the brand-new shocks! Go from the bottom first, as that will make the process easier. Just slide the new shock in and put the bolt through. Don’t forget to put the lever in – it’s gonna prevent the bolt from spinning while you’re securing the nut. Now, to be able to fit the top of the shock, you’ll need to compress it. The pry bar we used earlier will be of great help in this.
Put it against the F250’s body and press down on the shock. Be careful with it, of course, but don’t be too “shy” either. The absorbers can take a lot of abuse when they’re being compressed. Go ahead and line up the stud with the mounting hole. When it’s through the factory hole, you’ll be done with the hard part. Now, don’t forget to put the rubber and the middle washer before you secure the nut.
Finishing Up
As we’ve already learned, the top part of the shock is secured by two nuts. So, once the one on top is nice and steady, “handle” the lower one. This is important: most brand-new shocks have a plastic or rubber boot (it serves as a protective layer). Just “peel” it down a bit to access the nut with a wrench. Again, use the 13/16 wrench as we did before to make sure it doesn’t move while you’re securing the top nut.
Now, if you left the hood opened while we were removing the factory shocks, go back up and put the socket and the extensions through to tighten the nut from up there. Last, but not least, use the torque wrench to set the upper nut to 46 foot-pounds. Do the same with the lower bolt – Ford recommends 110 foot-pounds. And that is pretty much all there is to it! Lower the truck, and you’re good to go!
Add Comment