
If you have a hard tonneau cover on your truck and need to remove the seals, then this article is for you! Tonneau covers are a great way to keep items in your bed safe from rain and other harsh weather. However, there will come a time when it needs to be removed. In order to do that, we first need to remove the seal around the perimeter of the cover where it meets up with your truck’s cargo box. Removing these seals is not an easy task; however, by following these steps, anyone can do it!
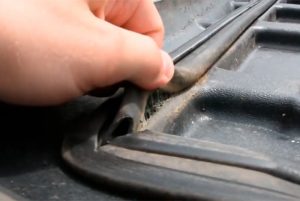 Step One – Find a sharp object that can be used to grab the seal. A screwdriver is perfect for this task because it has the pointed end and grip needed.
Step Two – Push down on one side of the seal with your hand while using your other hand’s fingers to pull up on the opposite side of edge, ripping at least an inch off its length. Repeat these steps until you have removed all of them from around the perimeter or if there are only two seals left, then just pry each out individually. You will find that they come loose quite easily once enough pressure is applied!
Step Three – Use a hose and spray water around the perimeter of your truck’s cargo box where the seal was removed to prevent dust or dirt from settling in. You should also wash down the side of your bed with soap and water for good measure!
Step Four – Clean up any leftover adhesive that may be on both sides using acetone, alcohol, lacquer thinner, nail polish remover, or another suitable cleaner (some people use WD-40). A putty knife can help remove excess glue off the trim so it doesn’t attract dirt again. Wet paper towels are perfect for this task because they gently clean while not scratching anything at all. This is probably one of those jobs you will need a helper if you have an extended hard tonneau cover.
Step Five – Once you have cleaned up the area, spray it with WD-40 so that any remaining glue will be loosened and easier to remove from your truck’s trim. Let dry for an hour or two before reinstalling! If there is still some stubborn adhesive left on either side of the seal, then use a solvent like lacquer thinner to rub it off. This can take several applications because once this type of cleaner comes in contact with paper towels or other cloths, it will quickly evaporate without doing anything at all (unless used in very small amounts). After removing these remaining adhesives, wipe down both surfaces again using wet paper towel and allow them time to fully dry before installing the seals again.
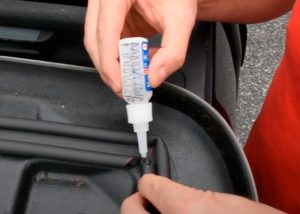 Step Six – Place one edge of the seal against your truck’s cargo box and line up the other side where you just removed it from with the gap that is there. Once they are lined up, then place a small amount of adhesive on both sides before pressing them together firmly for thirty seconds or so to create an airtight seal; this will prevent any water from coming in through these holes! If possible, use silicone rather than automotive glues because it dries quicker (no waiting) and has no fumes like petroleum-based glue does. Silicone also stays flexible which helps as well if something shifts in your bed while driving around corners or over bumps! This can sometimes happen when carrying large items like lumber at full capacity.
Step Seven – Now that the seal is back in place, make sure it’s sealed as tightly to your cargo box as possible by using a putty knife or an old credit card through the gaps and into places where you can’t reach with your fingers alone. This will help ensure no dirt gets inside of this area once again! It also helps prevent any moisture from staying on either side and causing rusting over time. Just be careful not to rip up more than what was needed when removing these seals from earlier because if they are too short, then water could get inside regardless even though we just did everything else correctly for our sealing job! If there are two sides left rather than four, then do both at a time instead of one at a time to save yourself some work and effort.
Step Eight – The last step is to get your truck’s tonneau cover back in place if you are reinstalling it. You will need two people for this so that one person can hold the seal tight against the bed while holding up an edge with another hand, then the other person lifts from underneath while pulling down on the first side like before removing these seals! If there is still any adhesive left over once we have inserted them into their proper places, then use more of what was just used on Step Six (silicone or automotive glue) and allow it to dry overnight before using again! Now enjoy all those benefits of owning a hard tonneau cover without having to worry about water getting inside anymore!
Step Nine – If you have an extended hard tonneau cover, then it will need to be removed from the edge of your truck’s bed and taken back off before reinstalling. One person can hold each end while another removes it by sliding their hands along the sides so that they don’t break anything or get scratched with all those sharp edges on these seals. Place one side against the cargo box again like Step Eight and proceed in a similar fashion as above for replacing them when installing this type of seal onto your vehicle (even though there are only two instead of four!).
Add Comment