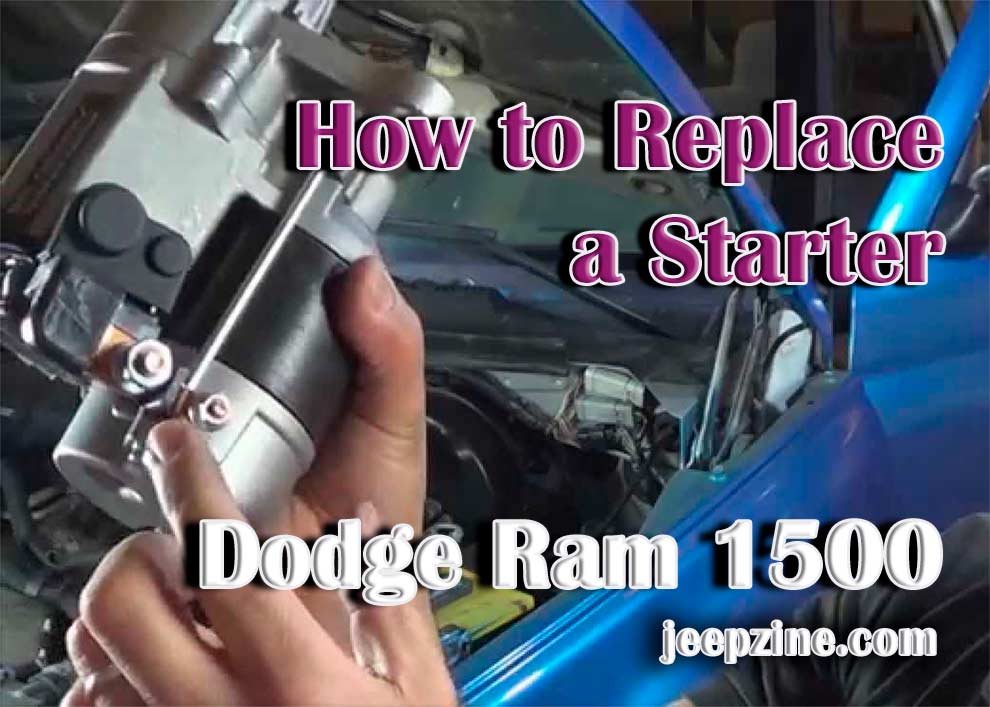
In this guide, we’ll walk you through the steps of a RAM 1500 starter replacement, detailing the process from preparation to installation. By learning how to locate and replace the starter on your Dodge RAM, you can save on mechanic fees and ensure your vehicle runs smoothly. We’ll cover everything from the initial setup with necessary tools to the removal of the old starter and the installation of a new one, specifically focusing on the Dodge Ram starter location.
Think of the starter as a smaller version of the truck’s main engine. When the battery releases a charge, it sends it to the starter. This unit sits right in the middle of the battery and the motor and has only one job – transmitting power. Obviously, when it’s malfunctioning, you won’t be able to fire up the engine. The Dodge Ram 1500 starter location is crucial in this process. Starters are pretty durable, but they do break down sometimes.
When that happens, the best thing any driver can do is buy a new one and throw the faulty part away. Don’t worry: it won’t take you more than an hour to install, and the price of a decent-quality replacement isn’t steep (+/- $150). Alright, join me in this how to change a starter guide, and let’s see how we can bring the RAM back on track!
Step #1: Preparations
Before we head into the thick of it, I want to mention that mechanics usually charge 100 US dollars for the replacement. Sometimes, this can cost you even more if you’re driving an older-generation 1500. So, if you do this right, you’ll get to save a lot of money! To get things done properly, there’s a shortlist of tools that we’ll need. Take a look:
 A flat-head screwdriver
- A standard (10mm) wrench
- A pair of ratchets (3/8-inch + 1/2-inch)
- A pair of sockets (13-14mm)
- An extension (4-6”)
- A set of protective gloves
- Eye goggles
If you’ve got a toolbox lying somewhere in the garage, I bet you already own some of these tools. And if not, buying them online/at a local store won’t break your bank. And make sure to not go cheap on the gloves and the goggles! Safety should always come first.
Step #2: Handling the Wiring
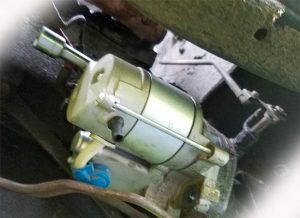
Ok, now let’s remove all the wiring to protect both the gear and our own hands. First of all, grab that wrench and remove the negative battery cable (it’s colored black). Put the disconnected cable in a spot where it will NOT have contact with the battery. This next part is a bit tricky because you’ll have to get under the RAM. More specifically, crawl under the driver’s side – that’s where the starter is located.
You’ll find it right above the exhaust system, somewhere between the motor and the gearbox (the transmission, to be exact). The starter has two wires running into it. The shorter and smaller wire connects the starter to the ignition switch. It’s secured by a plastic clip: squeeze on it a bit to remove it. The next wire is from the battery’s terminal and it’s held in place with one single nut. A 13mm socket will be perfect for it.
Additional Resources: How to Jump Start a Car Without Cables
Step #3: Removing the Old Starter
Now that we’ve disconnected both wires and the starter is free, it’s time to remove it. The only thing that’s holding it is a pair of bolts that go into the transmission unit. There’s very little space in there and limited visibility, which is why you’ll need an extension to reach the bolts. Actually, one of the bolts is pretty close to the truck’s tire and easier to get your hands on. However, it’s “hidden” under a black plate.
<!—->
And, there’s another cable attached to this plate. Make sure you don’t touch/damage it! Once both bolts are successfully out of the way, go ahead and slowly remove the starter. Just push it a bit, and it will slide out – in most trucks, there’s a slot in the transmission where the starter “sits”. It might be a good idea to diagnose the starter. Chances are, it’s not faulty and it’s just a matter of loose cables.
Step #4: Installing the New Unit
This is the easiest step. If you already bought a brand-new starter, all you’ll have to do is slide it into the same slot where the stock unit was. A quick note: the factory bolts that we just removed will probably be a bit rusty and/or worn out. The new starter package will include a set of replacement bolts – use them instead. Put both bolts into the mounting holes and tighten them a bit by hand. Next, torque them (30 ft.-lb. should be just right).
To complete the installation, don’t forget to reconnect all the wires. Some experts recommend labeling the cables so that you don’t mistake them, but they’re actually pretty different and won’t be hard to tell apart. The negative battery wire should be reinstalled last. Everything’s in place? Great! Get behind the wheel of your RAM 1500 truck and fire it up. If you did everything right, the engine will come to life.
Conclusion
By mastering the RAM 1500 starter replacement, you’ve not only saved on costly mechanic fees but also gained valuable insight into the inner workings of your vehicle. Understanding the Dodge Ram starter location and how to replace it empowers you to maintain your truck’s reliability and efficiency. This self-accomplished task enhances your ability to diagnose and fix potential issues, which in turn, ensures your vehicle operates smoothly for the long haul.
Your newly acquired skills are a testament to your ability to tackle complex tasks and keep your RAM 1500 in top condition. Enjoy the benefits of your hard work and the peace of mind that comes from knowing your vehicle is prepared for the demands of the road. With this crucial maintenance complete, your truck is ready to perform at its best, reflecting both your diligence and dedication to vehicle care.
Add Comment