Ecoboost, the environment-friendly edition of the F150, aims to maximize the MPG ratio. It does a pretty great job of that, especially compared to the gas-powered models. But what about the exhaust system – is it on par with the engine? Well, not quite: with the stock exhaust, you won’t get a roaring tone, a strong throttle response, or any performance gains.
It does handle the fumes decently, but not when pushed to the limit. So, that’s why I want you to think about replacing it with a third-party system. The whole process will take 1-2 hours, and a lot of bolts, nuts, and clamps, but it will be all worth it! But wait: how do you remove the old exhaust? And how do you install the new one? Find out in my detailed guide!
Getting Started
We begin the Ford F150 exhaust system replacement routine by getting everything ready for the job. The list of necessary instruments is actually pretty modest. First of all, you’ll need a jack with a couple of stands to lift the truck so that you can climb under there and get things done. Secondly, make sure you’ve got ratchets and sockets of the right size. In most cases, a ½ and a 3/8 ratchet should be enough.
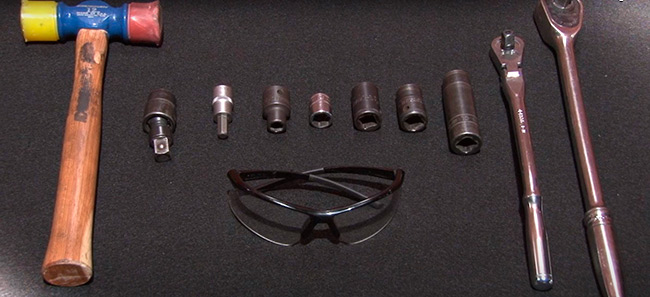
Next, I always pack two 15mm sockets (regular, and deep) and one 14mm socket. You might also need smaller sockets (like 10 and 8 millimeters). A hammer will come in handy as well, but a rubber one (otherwise, you might damage the factory exhaust). Oh, and don’t forget to put on a pair of protective gloves and safety glasses to cover your eyes. Last, but not least, get a bottle/can of high-quality penetrating lube. It will help with the removal.
Removing the Old Exhaust
Alright, let’s get right to it and lift the F150. Park the truck on a flat surface and turn it off. Let the vehicle cool off because the exhaust system (or, rather, the fumes) can get very hot. It should cool down in an hour or so. Now, most people do this in their garage, but I always prefer to handle gear removal/replacement on the outside. Once the vehicle is lifted, support it with jack stands from four lift points to ensure your own safety.
A quick note: don’t use a scissor jack unless you absolutely have to, because it isn’t particularly reliable. Everything’s looking good? Great, then grab that lubricant and spray it on the clamps, nuts, and bolts of the stock exhaust system. Don’t rush right into it: let the lube “soak in” for five to ten minutes.
The Front Pipe Comes First
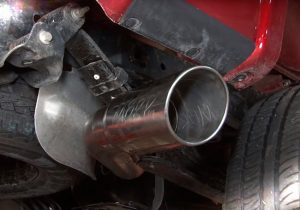
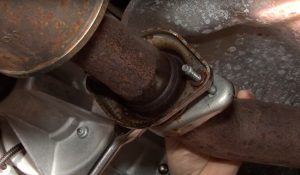 I recommend starting the removal process with the pipe that connects to the factory Y-pipe. It’s located in the rear end of the F150 Ecoboost and secured by a pair of regular bolts. Unscrew using a ratchet + socket combination from your toolset, and that will allow you to remove the pipe completely. If it’s not coming out willingly, use the rubber hammer I mentioned earlier to, well, push it out.
Put it aside carefully – chances are, you might need it in the future. Even if you’ve got the best Sounding Exhaust for F150 Ecoboost, chances are, it might not be a direct fit. In that case, you can just quickly install the old system back into place and use the truck until you order a replacement. Apply the spray once again to loosen up the rubber insulators.
Moving on with the Guide
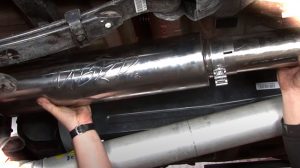
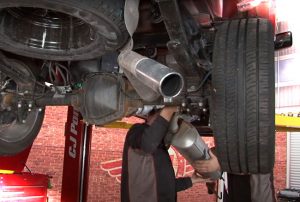 Now that we’ve successfully removed the first component, the next part of the exhaust system will be easier to “handle”. Essentially, it will be one long pipe running from the factory system to the tip. That means it shouldn’t take long to remove it; on the other hand, it will be pretty heavy. It would be best to ask a friend to help you out by lifting and holding the exhaust. It’s very well possible to do this on your own, but a little bit of help can go a long way.
Wiggle the whole thing a bit to get it loose. Be careful not to drop it, though! Here’s the deal: pipes will be held up by three hangers. The trick is to lift the exhaust high enough to free it from the hangers. Once that’s out of the way, carefully slide the pipes off and remove the entire construction.
Installing an Aftermarket Exhaust System
 Ok, we’ve just successfully removed the factory pipes. All that’s left to do is “reverse engineer” the process and put the new gear in place of the old, rusty factory system. The front pipe comes first: connect it to the stock downpipe using the provided hardware (nuts, bolts, and washers). Don’t over tighten the bolts: leave some room there. To secure the other side of the pipe, grab a clamp, slide it over, and put it into the rubber insulators.
The muffler comes next. Again, slide the clamps into the rubber insulators and connect the muffler to the front pipe. It will probably be a bit hard to connect it with your hands; so, use the rubber hammer to push it in. Repeat the process with the axle pipe. It might be a good idea to install the stock hanger + insulator onto the pipe. That way, it will be much easier to secure it. The exhaust tip is the final stop: line it up and we’re in business!
Finishing Up
 Go back to the very first pipe and make sure everything’s nice and tight. Once you’re happy with how the new exhaust system looks, return the F150 to the ground and remove the jack stands. Start the engine to make sure the aftermarket exhaust is doing fine, and take the truck for a spin. A 5-10-minute drive should be more than enough to check its efficiency. I bet you’ll like how the engine sounds now!
A quick note: in this guide, we discussed a classic exhaust system replacement for the F150 Ecoboost. Mainly, we handled the tubes, pipes, and the muffler, all the way to the tip. We didn’t touch the catalytic converter or the oxygen sensors. Again, in most cases, aftermarket exhausts don’t come with the converter – only what follows after it in the chain.
Conclusion
The F150 Ecoboost is a rather popular truck for the fans of fuel-efficient vehicles. It’s got a very powerful engine, a reliable transmission, and performs equally great on highways, city streets, and off-roading trails. But, there’s always room for perfection, and one of the most beneficial upgrades will be an aftermarket exhaust system. Today, we learned how to remove and replace an exhaust on our own, with no outside help.
It’s all about knowing what you want in advance, getting the right tools for the job, and following the instructions. Depending on your F150 model, the removal-installation process might be a bit different, but you’ll still be able to handle it once you’re through with this guide. Besides, you can always reach out to me!
Add Comment