
LED lights are bigger, brighter, last for a long time, and look cool on any vehicle. However, even if you have the Best LED headlights for F150, the installation process can be a bit “intimidating”. Well, don’t you worry, because I’ve got your back! We’ll go over the replacement/installation process step by step. All that you’ll have to do is follow my instructions closely.
Statistically, most modern-day drivers consider wiring to be the trickiest part, but, as we’ll learn today, it’s not that complicated. Alright, without further ado, let’s get right to it! We’ll start by preparing the truck; next, we’ll remove the stock bulbs, and only then move on to the actual installation.
#1: Getting Started
Before we go ahead and pop the hood, it’s very important to position the F150 right. I recommend parking it about 20 feet away from a wall (it could be your garage door). Turn the headlights on and pay extra attention to the beams. Use some sort of tape to mark them on that wall (you’ll need two pieces of tape – a horizontal and a vertical one). Everything’s looking good? Great, then turn the headlights and the engine off and let it cool for a while.
I recommend giving it at least 15-20 minutes. Some experts claim you can skip this part, but in my experience, rushing this process won’t do any good. With that out of the way, open the hood of the truck.
#2: Removing the Factory Lights
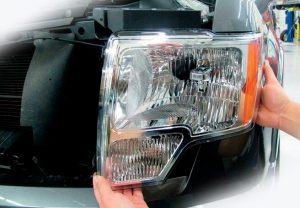 Depending on the setup, the factory headlights may not come off easily. So, when trying to pull them out, be extra careful not to damage anything. Use a screwdriver (preferably a flat one) to remove the wiring connector on the back of each bulb. Again, be gentle with it and turn the connector slowly. Don’t forget to unlock the springs that are holding the bulbs in place.
Next, remove the lens covers, as they’ll prevent you from dismounting the stock lights. In some older F150 models, it might be necessary to remove the front grill completely. This won’t take long: just remove the screws that are holding it in place, and that’s it.
#3: Installing the new LEDs
Moving on with our LED headlights replacement guide, it’s time to install the new LEDs! A quick note: pretty much every single headlight assembly includes a set of bulbs: the low beam and the high beam. That means you’ll need to install two bulbs on each side of the F150. By the way, we use the term “assembly” to describe the bulbs, the casings, the wires, the ballast, and the connectors. Now, the installation process is pretty simple and straightforward.
The most important thing here is to not over-tighten the bulbs, as that can lead to unwanted consequences. Therefore, don’t use any tools for this – only your hands. To safeguard yourself and the headlights, always wear protective gloves. We’re dealing with electricity here, after all! Also, make sure there are no fingerprints or tiny dust particles on the bulbs. Install the adapter first; then add the spring that holds the bulb. Connect the sockets, and that’s it!
#4: Wiring/Connecting the Ballast
 Alright, so, by now, we’ve removed the factory lights and successfully installed the new bulbs. The next stage is the wiring process. You’ll need the ballast for that. Essentially, it’s an electronic device that controls the amount of current flowing through an electrical circuit. We need it to protect our lights from spikes of voltage, among other things. One end of the ballast’s connector goes into the end of the bulb. The other one connects to the wiring of the F150.
Mounting the ballast is just as crucial as connecting it. If you don’t want it to bounce around on every bump, secure it on the inner fender (find a flat enough spot for that). Some folks use zip ties, two-sided tapes, or even self-tapping screws. However, I can’t really put trust in those things. For me, good-old metallic screws are the best. You’ll need to drill holes for them, of course.
Bulbs vs. Assembly
Before we move on to the final stage – testing – it’s very important to understand the difference between replacing the bulbs and the entire assembly. In many ways, the bulbs can be a bit more challenging, as you’re dealing with individual parts, rather than the entire thing. Now, if you’re wondering how to install headlight assembly, the process is very similar to dismounting the bulbs.
 You’ll need to pop the hood and dismount the grille, but instead of unplugging the connectors, remove the wiring directly from the back of the factory assembly. The screws holding the assembly in place need to come off as well. Once the new headlights are in place, plug the wiring and use the stock screws to secure the assembly.
#5: Turning the Headlights on
Start the engine, and turn the new LEDs on. Remember the marks we made earlier using tape? Park the F150 at the same exact position. The lights should be hitting those marks perfectly. If they’re not, use the adjusting screws to, well, re-adjust the horizontal and vertical positions of the headlights.
Add Comment