Leaks in radiators are a common problem, but they can be annoying and costly to fix. Fortunately, it is possible to stop a leak in a radiator and prevent further damage if you take the right steps. In this article, we will discuss how to fix a leaking radiator, what causes these leaks, and what measures you can take to prevent future problems.
Causes of Radiator Leaks
 Radiator leaks can be caused by many different factors. Some of the most common causes include corrosion or damage to components like the radiator cap or hose clamps; blockages in the radiator due to debris build-up; and damage caused by freezing temperatures or overheating fluids. In some cases, cracks may appear on the surface of the radiator due to age or improper installation. Learn here how to tackle a popped off radiator hose with our easy-to-follow guide and get your vehicle back on the road quickly with practical tips and straightforward solutions.
Preparing to Stop the Leak
Before attempting any repair work on your radiator, it is important to prepare your work area properly:
- Make sure that all power sources have been turned off –– this includes turning off water supplies as well as any heating source that could be running through your pipes;
- Wear protective gear such as safety glasses and gloves;
- Make sure you have the necessary tools and materials at hand, such as a wrench, a screwdriver, and any replacement parts.
Finding the Source of the Leak
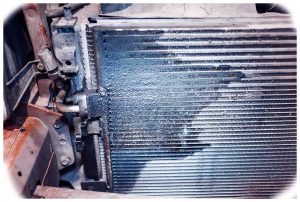 Once your work area is properly prepared and you have all of the necessary tools and materials, it is time to find the source of the leak. Start by checking for any cracks in the radiator itself –– these can be identified by looking closely at both the interior and exterior surfaces of the radiator. If you do not see any visible damage on either side, try filling up your radiator with water while checking for any leaks using a hose clamp or another method that prevents water from escaping.
Repairing the Damage
Once you have found where your leak is coming from, it is time to repair it. Depending on what caused your leak in the first place will determine how best to fix it:
- If there are cracks or holes in your radiator, use epoxy glue or a patch kit to seal them shut;
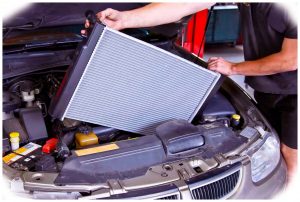
- If corrosion has caused damage to components like hoses or clamps, replacement parts should be installed;
- If there are blockages causing leakage due to debris build-up, removing them will help stop further leaks.
Final Tips for Prevention
To prevent future radiator leaks, it is important to perform regular maintenance on your Cummins radiator. This includes checking the hoses and clamps for any signs of damage or corrosion and replacing worn parts as necessary. Additionally, make sure you are using the right type of coolant fluid in your radiator and always keep your coolant levels topped up to prevent overheating. It is also a good idea to flush out your cooling system once a year in order to remove any debris or buildup that could lead to blockages or other problems.
|
Cause of Leak |
Fixing the Leak |
| Cracks or holes | Seal with epoxy glue or patch kit |
| Corrosion Damage | Replace damaged components such as hoses or clamps |
| Blockages | Remove debris build-up |
Conclusion
Leaks in radiators can be annoying and costly, but you can stop them if you take the right steps. Be sure to prepare your work area properly before attempting any repair work, find the source of the leak, and repair any damage that has been caused by corrosion or blockages before taking any other measures. Additionally, it is important to perform routine maintenance on your radiator in order to prevent future problems. Follow these steps and you can be sure that your radiator will remain leak-free.
Add Comment